Self-Guided Adult Learn-to-Ride Course

Let's learn to ride.

A calm, step-by-step course that takes you from nervous beginner to riding on your own — with safety and confidence leading the way.

Safety first, always No judgment · your pace Balance before pedals A short video for every skill

No experience needed. If you never learned as a kid — or it's been decades — you're exactly who this course is built for.

Start the course →

Steady Pedal Academy logo
Start here

What you'll be able to do

This course has one promise: by the end, you can get on a bike, keep your balance, pedal where you want to go, and stop safely — all on your own, and feeling good about it.

By the end, you'll be able to
  • Name the main parts of your bike and what each one does
  • Check your bike and fit your helmet before every ride
  • Glide and balance with both feet up
  • Push off from a stop, pedal, and steer where you want
  • Slow down and stop smoothly, putting a foot down with control
  • Look, signal, and share a path or quiet street safely
  • Confidently ride a bike!
How this course works
  • Watch, then do. Each skill starts with a short video or quick tutorial — see it first, then follow the steps and practice.
  • You set the pace. Nothing here is rushed. Repeat any step as many times as you like — that's how it's meant to work.
  • Feet stay down until you choose. You'll start with your seat low so you can always touch the ground. That safety net is why the fear fades fast.
  • Keep this guide. Videos, diagrams, drills, and a checklist you can come back to any time.

What you'll need to get started

Gather a bike that roughly fits you, a helmet, closed-toe flat shoes, comfortable clothes (nothing loose near the chain), and a water bottle — then find a large, flat, traffic-free space to practice. Before you begin, lower your seat so both feet reach the ground flat, and if you can, take the pedals off for the first balance drills (Module 2 explains why). Having a friend along to spot you and cheer you on is a bonus, never a requirement.

0
Module 0 · Foundation

Get to know your bike

Before you sit on it, get comfortable with the parts you'll be using.
~5 min
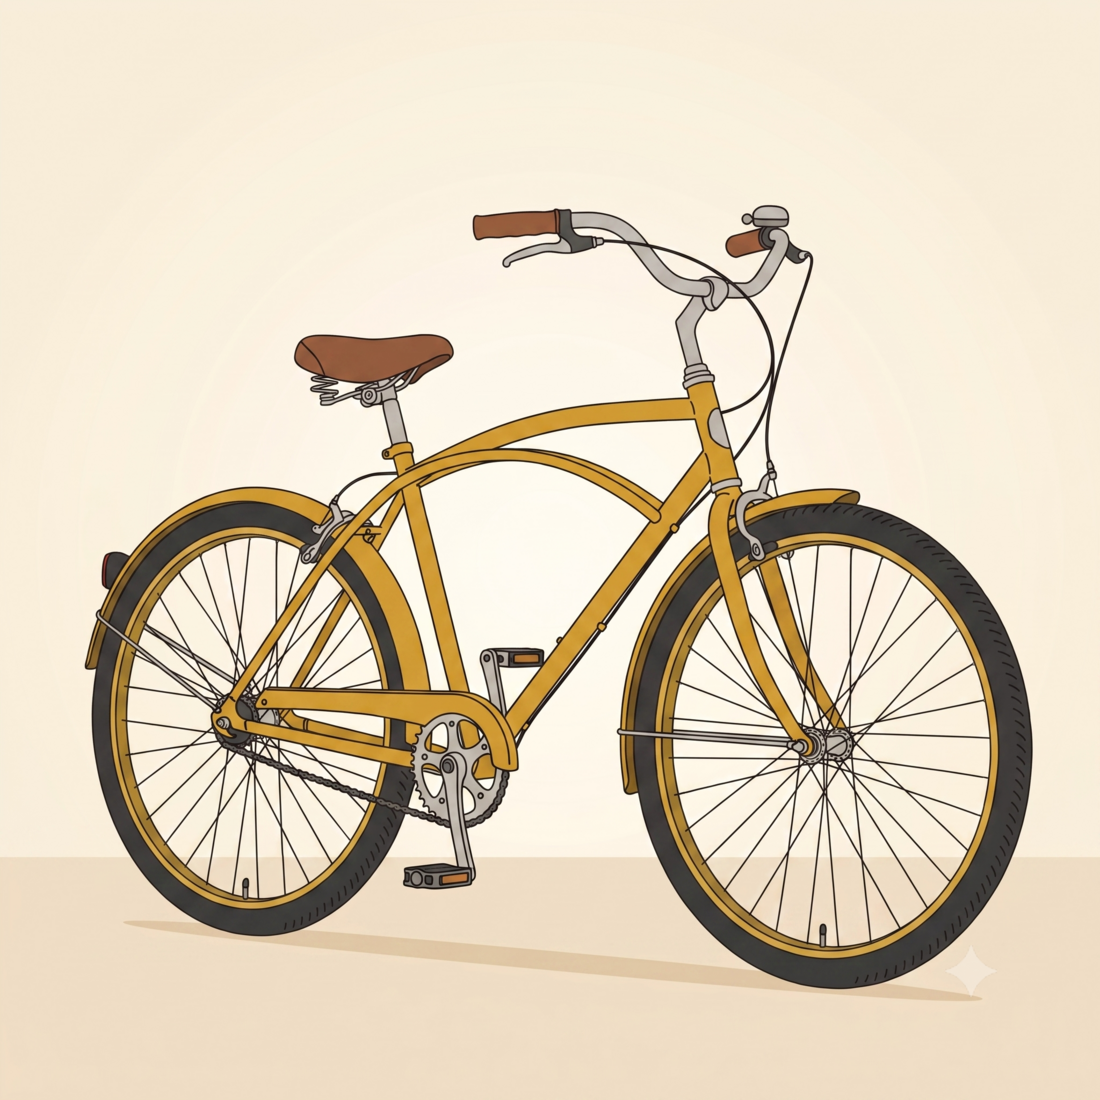
Labeled diagram of a bicycle showing its main parts
Add your bike photo to this folder as bike.png
and the numbered labels below will appear on it.
1 2 3 4 5

1 Saddle · 2 Handlebar · 3 Frame · 4 Pedals & crank · 5 Wheel & tire

The parts you'll hear us mention

  1. Saddle (seat). You'll start with it low so both feet reach the ground, then raise it as your confidence grows.
  2. Handlebar. Steers the bike — and your brake levers live here. Keep a relaxed grip and soft elbows.
  3. Frame. The body of the bike that holds everything together.
  4. Pedals & crank. Where your feet push to move you forward.
  5. Wheels & tires. Keep them firm and check them before every ride.
One more: if your bike has gears, they make pedaling easier or harder — ignore them until you're rolling comfortably. Try this now: point to each numbered part on your own bike and say what it does.
1
Module 1 · Every single ride

Safety first

Helmet on right, bike checked, safe spot chosen — this comes before every ride.
~10 min
Watch first
Your video goes here Save your clip in this folder as videos/1-safety-first.mp4
How this video was made: This short was produced with AI. The live-action footage was generated using Google Gemini (Veo), and the individual clips were then assembled and edited together in Camtasia.
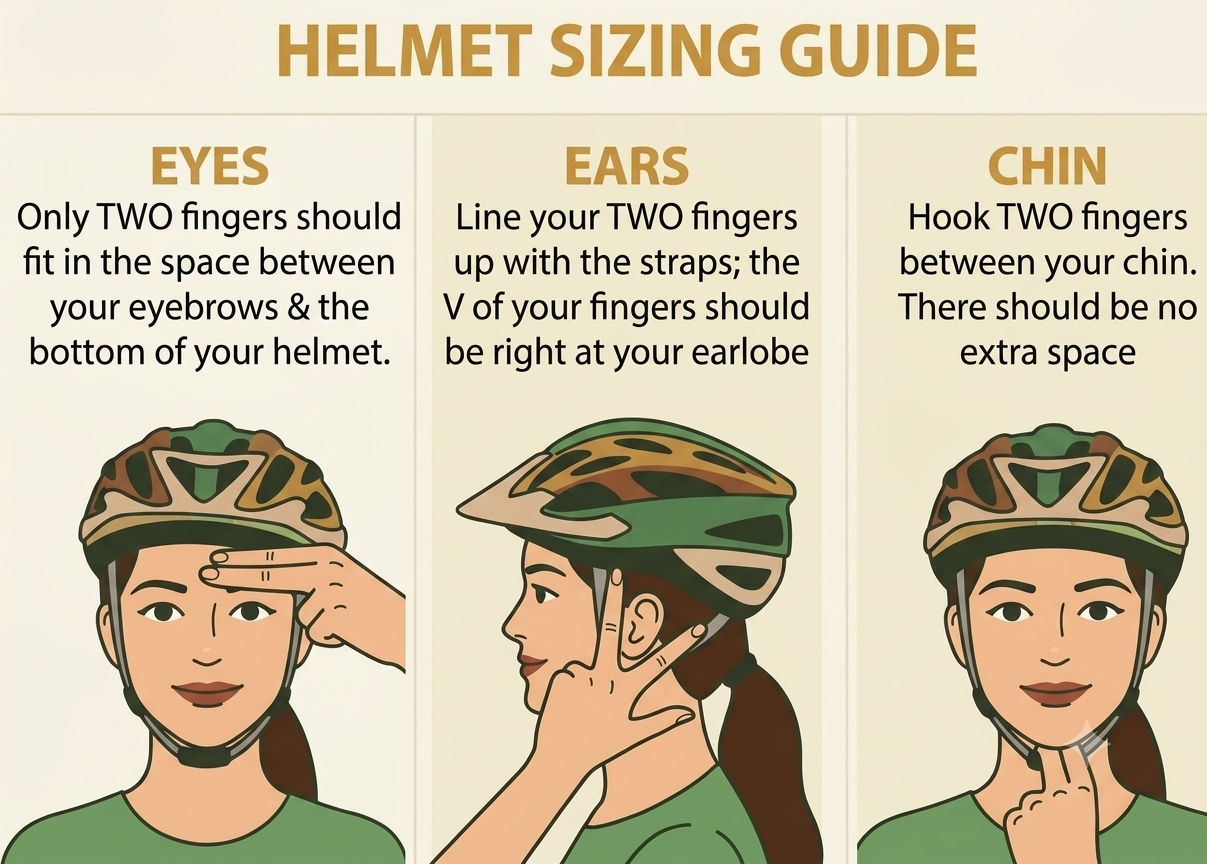
Helmet Sizing Guide — Eyes, Ears, Chin fit checks
Save your helmet sizing guide image in this folder as helmet.png and it will appear here.

Before you roll: the ABC Quick Check

ABCQUICK
A
Airtires firm
B
Brakesboth grip
C
Chainon & oiled
  • A — Air: press both tires; they should feel firm, not squishy.
  • B — Brakes: squeeze each lever and roll the bike — both wheels should stop.
  • C — Chain: it should sit on the gears, move freely, and not be rusty or loose.
Then "Quick": make sure the wheels are on tight and give the bike a little bounce — nothing should rattle.

Run the ABC Quick Check every time before you ride — thirty seconds now saves a wobble later.

Set yourself up to succeed

What to wear

Closed-toe flat shoes, fitted trousers or a cuff clip, bright colors, and gloves if you'd like extra grip.

What to avoid

Loose wide trousers near the chain, dangling scarves, flip-flops or slick soles.

Where to practice

A large, flat, traffic-free paved area — an empty car park or a tennis/basketball court. Smooth ground, room to glide, no hills yet.

The main event

How to ride — one skill at a time

Each module below is a single skill: watch the short video, follow the steps, and see how you'll know you've got it. Don't move on until the skill feels comfortable — repeating it is the practice.

2
Module 2 · The big one

Balance & glide

Glide with both feet up for 5+ seconds. Nail this and you're most of the way there.
30–45 min
Watch first
Your video goes here Save your clip in this folder as videos/2-balance-and-glide.mp4
How this video was made: The visuals were created from public YouTube videos, paired with an original voiceover created using Epidemic Sound, and stitched together in Camtasia.

Do this

With the pedals off and your seat low enough that both feet sit flat on the ground:

  1. Sit and walk. Walk the bike forward with flat feet. Get a feel for keeping it upright underneath you.
  2. Scoot. Push with longer strides — like running while seated — and let the bike carry you a moment between steps.
  3. Glide. Build a little speed, then lift both feet and coast. Look ahead, not down at the wheel.
  4. Stretch it out. Keep going until you can glide 5+ seconds, steering gently to stay balanced. Rest whenever you like.
Remember: your feet are always right there. Put them down any time — that's the whole point. Look at where you want to go, not at the ground.
You've got it when: you can coast in a roughly straight line, feet up, shoulders relaxed, eyes ahead — and you catch yourself smiling.
If this trips you up
Try this
You keep staring at the front wheel
Pick a target 15–30 feet (5–10 m) ahead and look at it. Your balance follows your eyes.
Your arms are stiff and grippy
Shake out your hands; soften your elbows so the bike can wiggle under you.
You wobble and can't balance
You need a bit more speed — scoot harder before lifting your feet.
3
Module 3

Pedaling & pushing off

Pedals go back on — now you'll push off and ride under your own power.
~30 min
Watch first
Your video goes here Save your clip in this folder as videos/3-pedaling-and-pushing-off.mp4
How this video was made: The visuals were created from public YouTube videos, paired with an original voiceover created using Epidemic Sound, and stitched together in Camtasia.

Do this

  1. Pedals back on, seat raised just a touch — still low enough to reassure you.
  2. Find your "power pedal." Set one pedal up at the 2 o'clock position and rest your foot on it.
  3. Push and go. Press down firmly on that pedal while pushing off with your other foot — the bike moves; place your second foot on its pedal.
  4. Keep the wheels turning. Steady, even pedal strokes. A little speed makes balancing easier, so don't pedal too slowly.
  5. Breathe and look ahead. Pick a far point and pedal toward it. Feet down whenever you want, then go again.
You've got it when: you can start from a standstill without help, get both feet on the pedals within a few feet (a meter or two), and pedal a smooth straight line.
If this trips you up
Try this
You look down hunting for the pedal
Feel for it with your foot and keep your eyes forward.
It wobbles when you pedal slowly
A bit more speed = more stability. Pedal with purpose.
You can't get going on flat ground
Use a strong first power-pedal press; a very gentle downslope helps at first.
4
Module 4

Steering & turning

Ride a straight line, then gentle curves — in control.
~30 min
Watch first
Your video goes here Save your clip in this folder as videos/4-steering-and-turning.mp4
How this video was made: This video was created using LongStories.ai and edited together in Camtasia.

Do this

  1. Straight lines first. Pick a far target and ride to it. Steering is tiny constant corrections, not big turns.
  2. Look where you want to go. Turn your head and eyes toward the exit of the turn — the bike follows your gaze.
  3. Gentle wide curves. Lean and steer softly, and keep pedaling lightly through the turn.
  4. Figure-eight. Set two markers about 30 feet (10 m) apart and loop around them. This builds both directions and your confidence.
You've got it when: you can make smooth curves both left and right, eyes leading the turn, without needing to put a foot down.
If this trips you up
Try this
Your steering is jerky
Relax your grip and make gentler moves; a little speed smooths it out.
You keep drifting toward things you want to avoid
Look at the gap, not the obstacle — you go where you look.
You wobble in the turn
Keep light pedal pressure to hold your momentum and balance.
5
Module 5 · Just as important as going

Braking & stopping

Slow smoothly, stop where you mean to, and put a foot down safely — every time.
~20 min
Watch first
Your video goes here Save your clip in this folder as videos/5-braking-and-stopping.mp4
How this video was made: This video was created using LongStories.ai and public YouTube clips, edited together in Camtasia.

Do this

  1. Know your levers. Usually one lever is the rear brake and one the front. Standing still, squeeze each and roll the bike to see which wheel it stops. Practice squeezing both gently and evenly.
  2. Slow, don't grab. Squeeze progressively. Favor even braking; a sudden front-only grab can pitch you forward.
  3. Level the pedals, then step down. As you stop, bring the pedals level, lean the bike slightly, and place one foot flat on the ground.
  4. Practice planned stops. Ride to a cone and stop with your wheel on it. Repeat until stopping feels as natural as starting.
You've got it when: you can stop smoothly on request within about six feet (a couple of meters) and confidently put a foot down without tipping.
If this trips you up
Try this
You grab the front brake hard
Lead with even/rear braking and apply the front gently.
You forget to put a foot down
Say it out loud: "brake → level pedals → foot down."
You stop suddenly and panic
Start braking earlier and softer; give yourself room and time.
6
Module 6 · Out in the world

Road & path awareness

Once Modules 2–5 feel solid, you're ready to share paths and quiet streets safely.
~30 min

Scan · Signal · Position

Scan look back & ahead Signal arm out to turn Position ride predictably
  • Scan: practice glancing over your shoulder while riding straight — look back without swerving. Check ahead and behind before any move.
  • Signal: point clearly with your arm before turning, then bring your hand back to the bar.
  • Ride predictably: hold a steady line, no sudden swerves, and make eye contact with drivers and others.

Sharing the space

  • Start on shared paths and quiet streets, not busy roads. Add road exposure gradually as your confidence grows.
  • Pedestrians first: slow down, ring your bell or call "passing on your left," and give room.
  • Read the surface: watch for gravel, wet leaves, drain grates, potholes and opening car doors — steer around them early.
  • Follow the rules: ride with traffic, obey signals, and use lights in low light.
  • One thing at a time: add distance, then light traffic, then junctions — never all at once.
You've got it when: you can look back, signal, and hold your line while still pedaling — and you pick safe, low-stress routes on your own.
Your roadmap

Your practice plan

Here's how the sessions typically flow. It's a guide, not a race — repeat any session until the skill feels easy. Every session ends on something you can already do well.

SessionYou'll focus onWhat you'll doReady to move on when…
1 · Setup & balanceModules 0–2Parts tour · helmet + ABC check · sit, walk, scoot, first glidesYou glide 5+ seconds with your feet up
2 · Pedal powerModule 3 (+ recap 2)Power-pedal starts · pedaling a straight lineYou start on your own and pedal straight
3 · Steer & stopModules 4–5Straight lines · wide curves · figure-eight · planned stops on a coneYou turn both ways and stop smoothly
4 · Put it togetherModules 2–5Start → ride a loop → turn → controlled stop, over and overYou ride a full loop on your own
5 · Real world (optional)Module 6Shoulder checks · signaling · a quiet shared-path rideYou scan, signal, and hold a line on a real path

A few things to remember on tough days

Nerves are normal

Feeling wobbly or scared doesn't mean you're doing it wrong — it means you're learning. Your feet stay down until you decide.

Small wins count

A three-second glide is a real milestone. Notice it. Confidence stacks up faster than you'd think.

Your pace, your call

Nobody's rushing you. Repeat anything as often as you need. Stopping to rest is part of the plan.

Track your progress

Your skills checklist

Tick each skill when it feels comfortable — you decide when it's solid. Your progress saves in this browser, so you can pick up right where you left off. Every box ticked means you can ride on your own.

0 of 0 skills done You can ride independently

Safety habits

Know my bike

Balance & glide

Pedal & push off

Steer & turn

Brake & stop

Road & path sense

Confidence

Extra resources

More to explore

Trustworthy outside resources to review between sessions. They back up exactly what you'll do in this course.

Links open in a new tab and go to third-party sites; availability may vary. The videos and drills in this course stand on their own if any link changes.